{{ page.title }}

{{ page.description }}

Introduction

NextGen Live is Brightcove's next-generation live streaming solution that provides improved reliability, consistency, and scalability. The NextGen Live module can be used to broadcast live events to both desktop and mobile devices with enhanced features and better performance than Legacy Live.

After entering your event information into NextGen Live, you will be provided with streaming endpoint URL that you configure in your encoder.

NextGen Live supports two types of streaming configurations:

Prerequisites

Before you can broadcast a NextGen Live event, the following items are required:

Limitations

Billable States

Billing for NextGen Live channels applies to active states:

Active States (billing applies)

Inactive States (billing does not apply)

Managing NextGen Live Channels

To access the Live module, log in to Video Cloud Studio and click Live in the left navigation. The Channels page displays all your NextGen Live channels organized into four tabs:

NextGen Live Channels page

Each channel displays the following information:

You can search for channels using the search bar, and sort results using the Created Date sort button.

Channel Actions

Click a channel row to open the Control Room. From the Control Room header, you can start or stop the channel, open the Embed on Web dialog, open the Create Clips dialog, and access the three-dot menu (⋮) for additional actions (Edit JSON, Copy Channel ID, Archive). See Control Room for details.

Creating a New NextGen Live Event

For complete step-by-step guides to creating and streaming NextGen Live events, see:

To create a new NextGen Live channel, click New Channel at the top right of the Channels page. A 3-step wizard will guide you through the setup.

Step 1: Choose Channel Type

Select the type of channel to create:

New Channel - Step 1: Choose channel type

Click Next to continue.

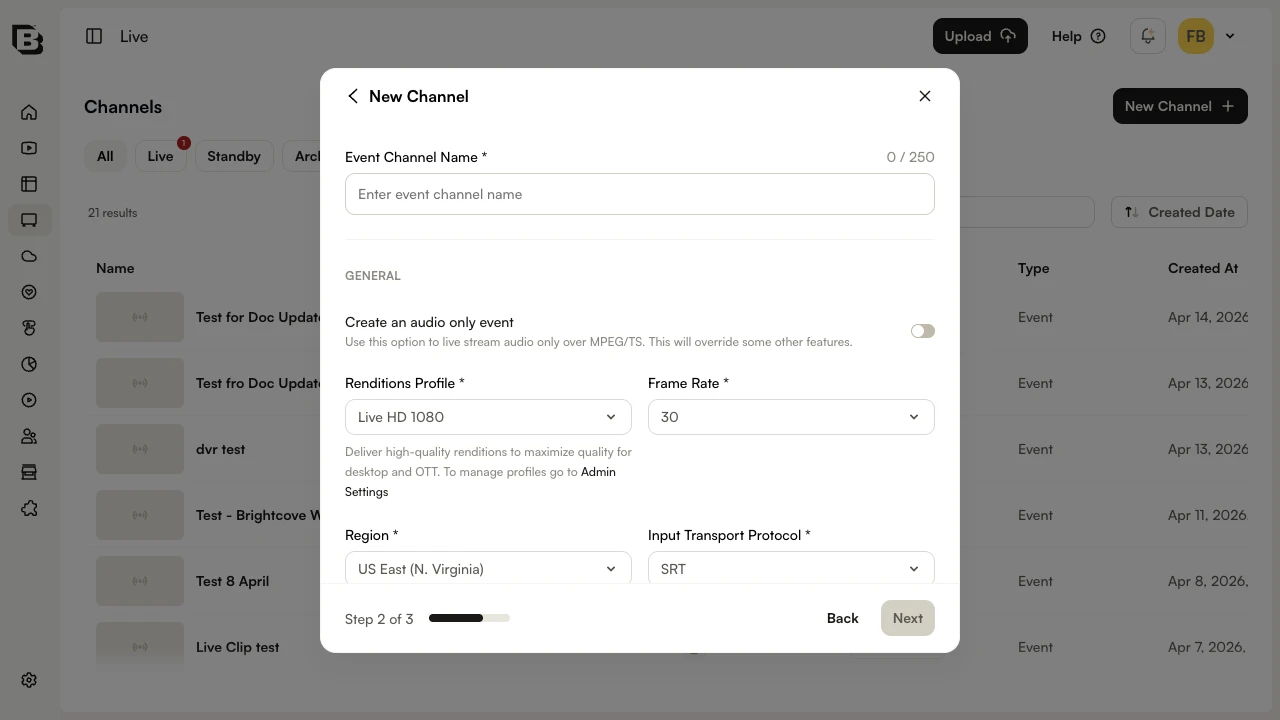
Step 2: Channel Configurations

Configure the core settings for your channel:

General

Input

VOD

Renditions

A preview of the Video Renditions and Audio Renditions that will be created based on the selected renditions profile is displayed at the bottom of this step.

New Channel - Step 2: Channel Configurations

Click Next to continue.

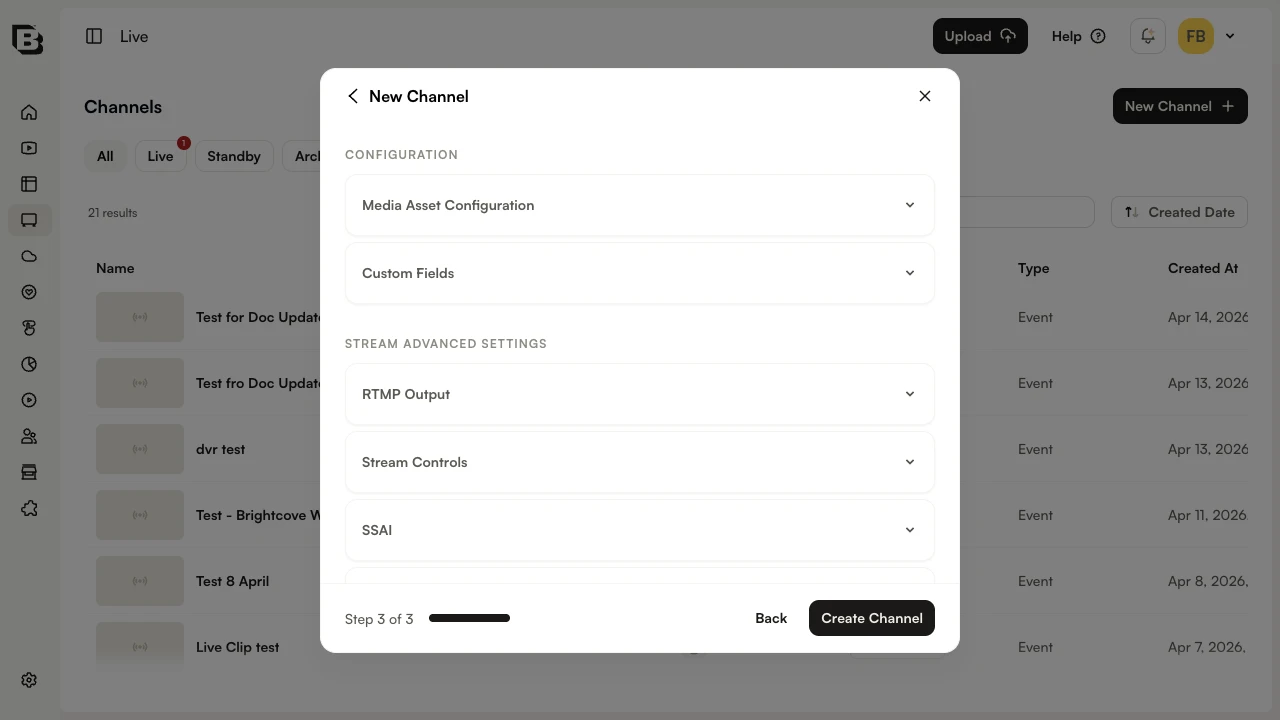
Step 3: Advanced Settings

Configure optional advanced settings using the expandable accordion sections:

New Channel - Step 3: Advanced Settings

Configuration

Stream Advanced Settings

Click Create Channel to create the channel. The Control Room will open with details about your channel.

To start streaming, click Start in the Control Room header. The encoder must be started within 30 minutes of when the channel is started.

Configuring Advanced Options

NextGen Live provides advanced configuration options that can be set during channel creation (Step 3) or modified after creation through the Channel Settings modal. The advanced options are organized into accordion sections.

NextGen Live Advanced Options

Digital Rights Management (DRM)

Configure DRM encryption for your live stream:

RTMP Output

Delivers a live stream to external RTMP destinations simultaneously with Brightcove playback. Click Add RTMP to configure an output:

Stream Controls

Configure stream behavior and advanced streaming features:

Captions

NextGen Live supports closed captions with enhanced compatibility across platforms:

Supported Caption Formats

Caption Configuration

Configure caption languages for maximum compatibility:

Caption Language Examples

Common language codes for captions:

API Configuration

When creating a NextGen Live channel via API, configure captions in the job payload:

{
  "outputs": {
    "caption": [
      {
        "type": "embedded_closed_caption",
        "passthrough": true,
        "language_code": "eng"
      },
      {
        "type": "embedded_closed_caption", 
        "passthrough": true,
        "language_code": "spa"
      }
    ]
  }
}

This example configures two caption languages (English and Spanish) that will be passed through from the input stream with proper language identification.

Server-Side Ad Insertion (SSAI)

Configure SSAI for ad insertion into live streams:

Audio Tracks

Configure multiple audio tracks for your live stream:

Notifications

Configure event notifications:

Maintenance Settings

Configure maintenance windows for your channel:

Maintenance Best Practices

For 24x7 channels, consider the following to minimize any potential viewer impact:

Editing NextGen Live Channels

After creating a NextGen Live channel, you can edit certain configuration options through the Channel Edit page. However, not all fields can be modified after creation.

Fields That Cannot Be Edited

The following fields are immutable and cannot be changed after channel creation:

Core Infrastructure

Manifest Configuration

Input Configuration Restrictions

Output Restrictions (Existing Outputs)

Advanced Features

Fields That Can Be Edited

The following fields can be modified after channel creation:

Input Configuration

Output Configuration

External Outputs

Advanced Settings

Editing Process

To edit a NextGen Live channel, you have three options:

Option 1: Edit from Live Module Channels Page

  1. Ensure the channel is in the "Off" state
  2. From the Live Module channels page, click the ellipsis (...) menu for the channel
  3. Select Edit JSON from the dropdown menu
  4. Modify the JSON configuration directly
  5. Click Save to apply changes

Option 2: Edit from Control Room

  1. Ensure the channel is in the "Off" state
  2. Click on the channel name to open the Control Room
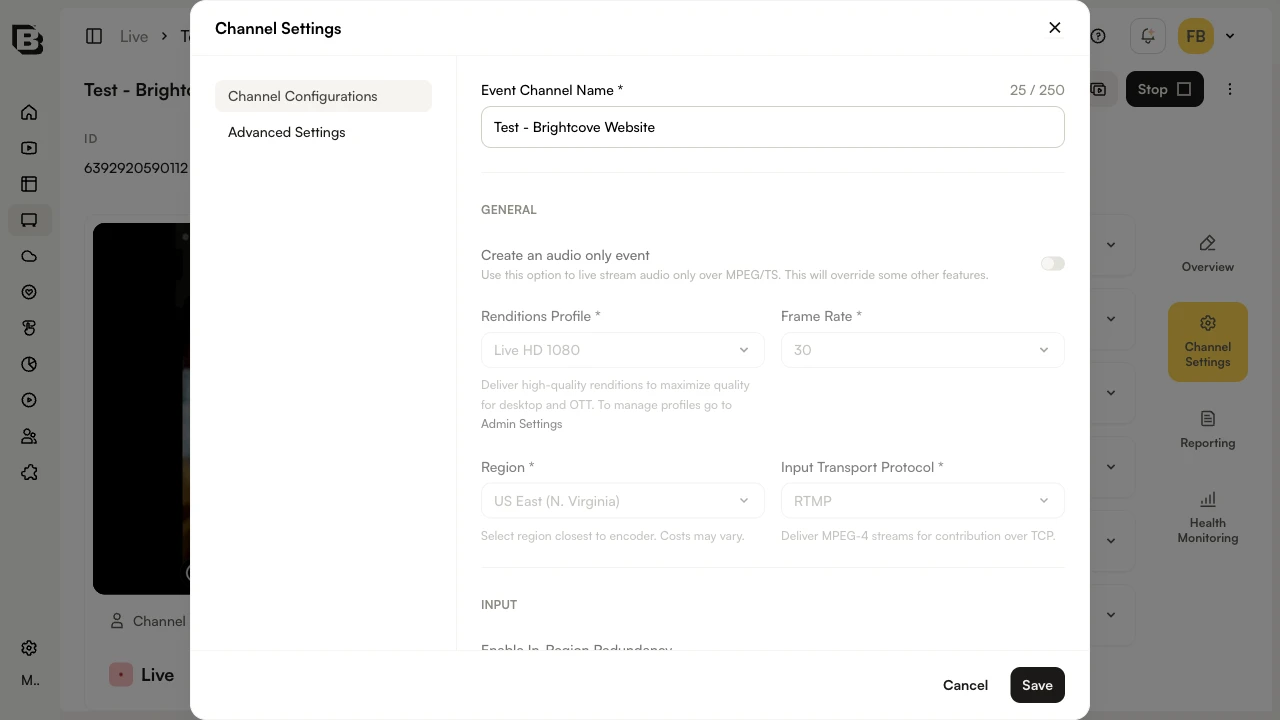
  3. Click the Channel Settings tab in the right sidebar
  4. In the Channel Settings modal, use the Channel Configurations or Advanced Settings sub-sections to modify the available options
  5. NextGen Live Channel Settings
  6. Click Save to apply changes

Option 3: Edit via API

You can also update NextGen Live channels programmatically using the NextGen Live API:

PUT /v2/accounts/{account_id}/jobs/{id}

For detailed API documentation and examples, see the NextGen Live API Reference.

Viewing Channel Information in the Control Room

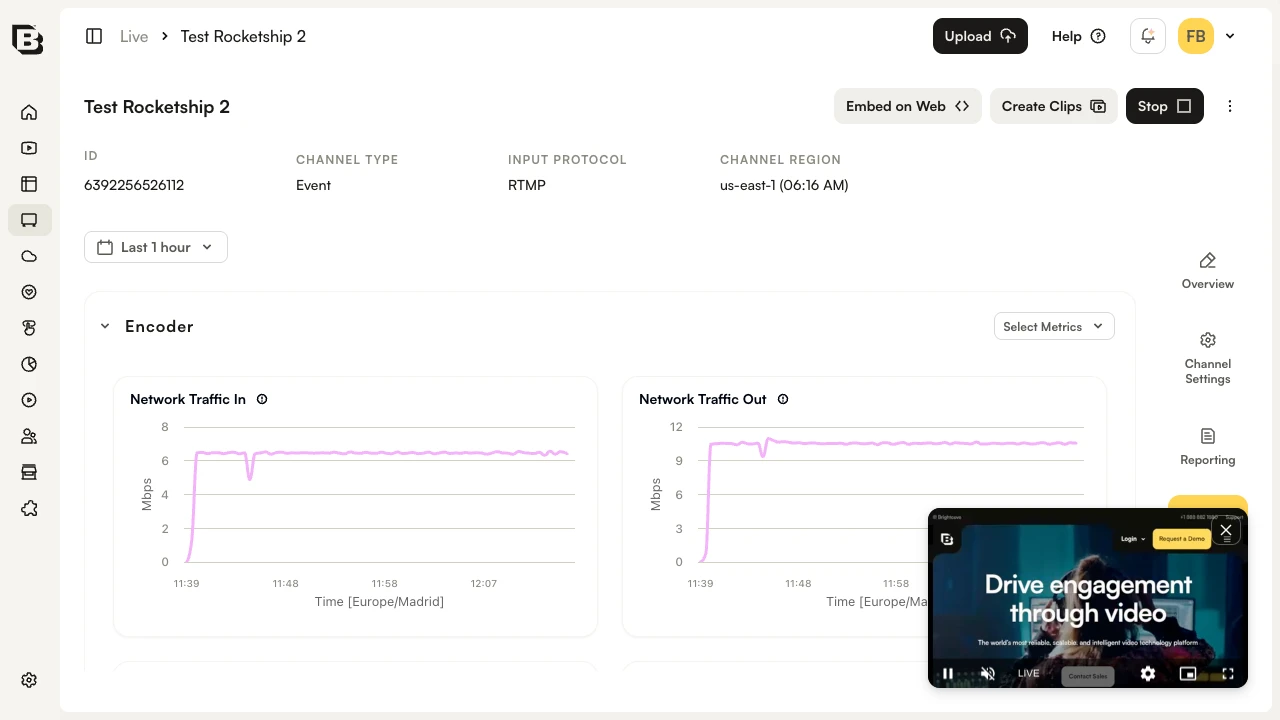
The Control Room provides detailed information about your NextGen Live channel. Click on a channel name from the Channels page to open the Control Room, which displays comprehensive channel management and monitoring capabilities.

NextGen Live Control Room

Header

The Control Room header displays the channel name, metadata (ID, Channel Type, Input Protocol, Channel Region), and the following action buttons:

Navigation Tabs

The Control Room includes four tabs in the right sidebar:

Input Source

The dark Input Source panel displays your encoder connection details:

Below the Input Source panel, a status bar displays: Channel status (Off/On), Input Source (Connected/Disconnected), Current Viewers count, and Elapsed Time.

Overview Tab

The Overview tab displays accordion sections with channel details:

Channel Settings

Click the Channel Settings tab to open a modal with two sub-sections:

Generating Embed Code for NextGen Live

To generate embed code for a NextGen Live channel:

  1. Click on a channel to open the Control Room
  2. Click Embed on Web in the header. The Embed on website dialog will open.
  3. Select a Player from the dropdown
  4. Configure sizing options:
    • Player Sizing - Choose between Fixed or Responsive sizing
    • Aspect Ratio - Select aspect ratio (e.g., 16:9 (Desktop))
    • Player width and Player height - Set dimensions in pixels
  5. Choose embed code type:
    • iframe - Standard iframe embed code
    • JavaScript - Advanced JavaScript embed code with video-js tag
  6. Use the action buttons at the top right of the dialog:
    • URL - Get the direct player URL
    • Preview - Preview the player
  7. Click Copy to copy the generated embed code
  8. Click Done to close the dialog
NextGen Live Embed on Web

Important Tips

Understanding Playback Tokens

NextGen Live uses the livePlaybackToken parameter to ensure that playback behavior matches the channel’s configuration.

What is livePlaybackToken?

The livePlaybackToken is a JWT (JSON Web Token) generated by the NextGen Live API. It contains encoded configuration details that determine how playback is delivered for a specific live channel.

This may include settings such as:

When is livePlaybackToken generated?

A livePlaybackToken is automatically generated for all NextGen Live channels when the channel is published — even if advanced features are not enabled.

Is livePlaybackToken required?

While playback may work without the token, always including it ensures:

What happens if the token is omitted?

If the livePlaybackToken is not included in a Playback API request:

Playback may still succeed, but it behaves as a standard live stream without advanced channel configuration.

Feature dependency overview

livePlaybackToken Feature Dependency
Feature Requires livePlaybackToken Behavior if Token Is Omitted
Basic Live Playback No Playback works using default live delivery.
DVR Yes No DVR window or seek capability.
SSAI Yes No ad insertion. Playback bypasses SSAI endpoints.
DRM Yes Playback may not fully reflect the channel’s DRM configuration.
BYO CDN Yes Playback uses the default CDN instead of the configured BYO CDN.

Brightcove Player vs Custom Playback API Integrations

Brightcove Player embed codes automatically include the livePlaybackToken.

For custom Playback API integrations:

Example Playback URL


https://players.brightcove.net/ACCOUNT_ID/default_default/index.html?videoId=VIDEO_ID&livePlaybackToken=TOKEN_VALUE

Using RTMP Outputs

NextGen Live supports RTMP outputs to stream simultaneously to external platforms like Facebook, YouTube, or custom RTMP endpoints.

To configure RTMP outputs:

  1. In the Control Room, scroll to the RTMP Outputs section
  2. Click Add RTMP Output
  3. Enter the RTMP Output URL (destination)
  4. Select the Rendition to send:
    • Choose a specific quality rendition
  5. Click Add to start the RTMP output
NextGen Live RTMP Outputs

Monitoring Your Stream

NextGen Live provides comprehensive monitoring capabilities:

Health Monitoring Dashboard

NextGen Live provides comprehensive health monitoring organized into three main sections:

Ingest Metrics (SRT streams only)

Encoder Metrics

Packager Metrics

For more information, see Health Monitoring Dashboards.

NextGen Live Extended Monitoring

Creating Clips

NextGen Live supports creating video clips from your live stream:

To create a clip:

  1. In the Control Room, click Create Clip
  2. Set the start and end times for your clip
  3. Enter clip metadata (name, description, tags)
  4. Click Create Clip
NextGen Live Create Clip

Archived Channels

NextGen Live channels can be manually archived and moved to the Archived Channels section of the NextGen Live dashboard. Archiving a channel is a manual action that you perform when you want to remove it from the active channels list.

Brightcove can also archive inactive channels for you, after a retention period set by an account administrator. See Automatically Archiving Inactive NextGen Live Channels.

Notes about archived channels

Media Asset Retention

The Live media asset associated with the channel behaves differently depending on whether Live-to-VOD conversion is enabled:

Channels Without Live-to-VOD

Channels With Live-to-VOD Enabled