{{ page.title }}

{{ page.description }}
 

Introduction

The Live module can be used to help you broadcast a live event to both desktop and mobile devices. After entering your event information into the Live module, you will be provided with a set of encoder settings that you plug into your on-site encoder. All transcoding is done in the cloud so you don't need a hardware based transcoder.

Depending on your Live subscription, you may have the ability to create events, channels or both. Typically, events are created to stream shorter length, one time or recurring events. Channels are typically used when delivering 24/7 live events. Channels and events are billed differently - check with your Customer Success manager for details.

Prerequisites

Before you can broadcast a live event, the following items are required:

Limitations

Billable states

Billing for live jobs applies to Active states:

Active states (billing applies)

Inactive states (billing does not apply)

Managing live events

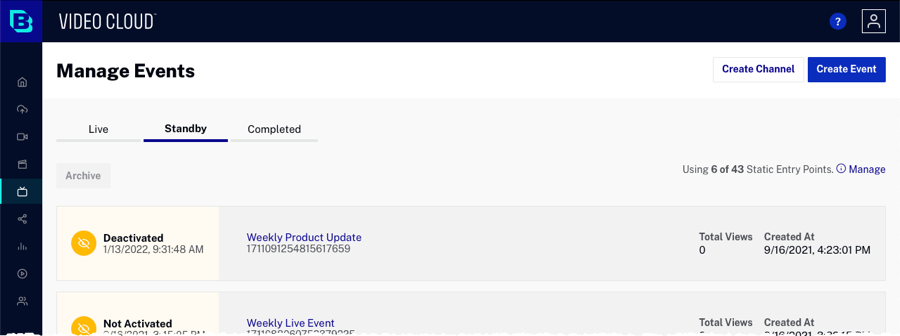
To access the Live module, login to Studio and click Live in the primary navigation. After logging in, your Brightcove account name will appear in the upper right corner of the page. If you have multiple accounts, use the account switcher dropdown to select the account you would like to work with. If the account you select hasn't been enabled for Live, an introductory "Brightcove Live" video page will appear. The Manage Events page displays three main tabs:

The Show dropdown can be used to filter the events that appear on the Completed tab.

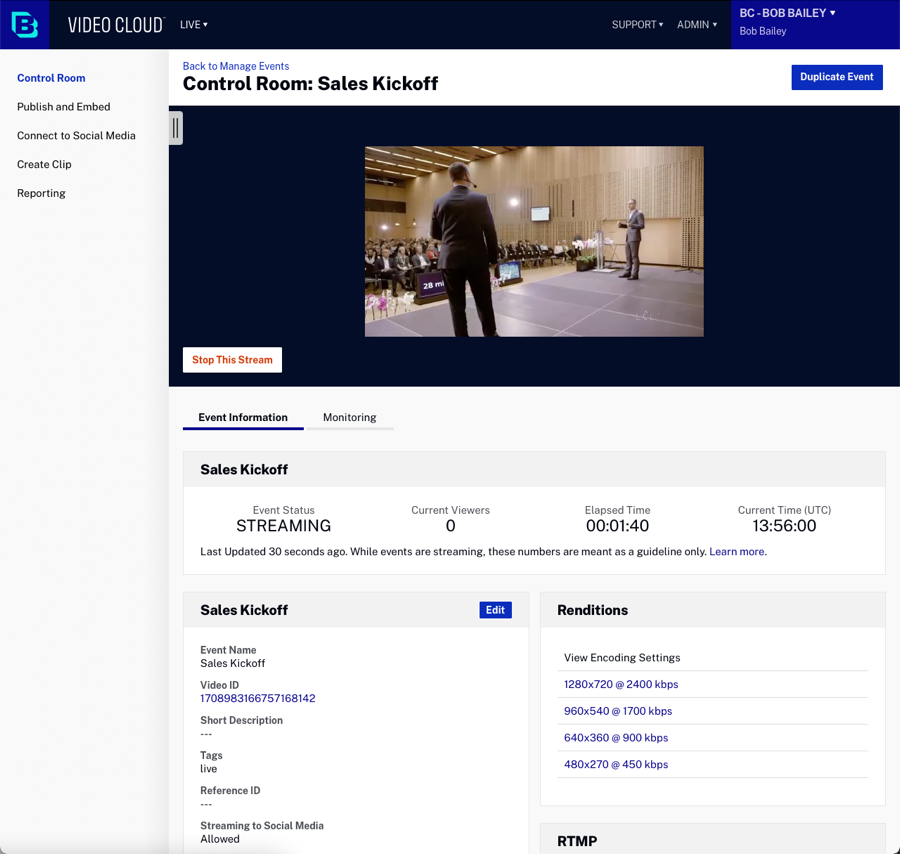
The body of the page will display a list of live events with related information:

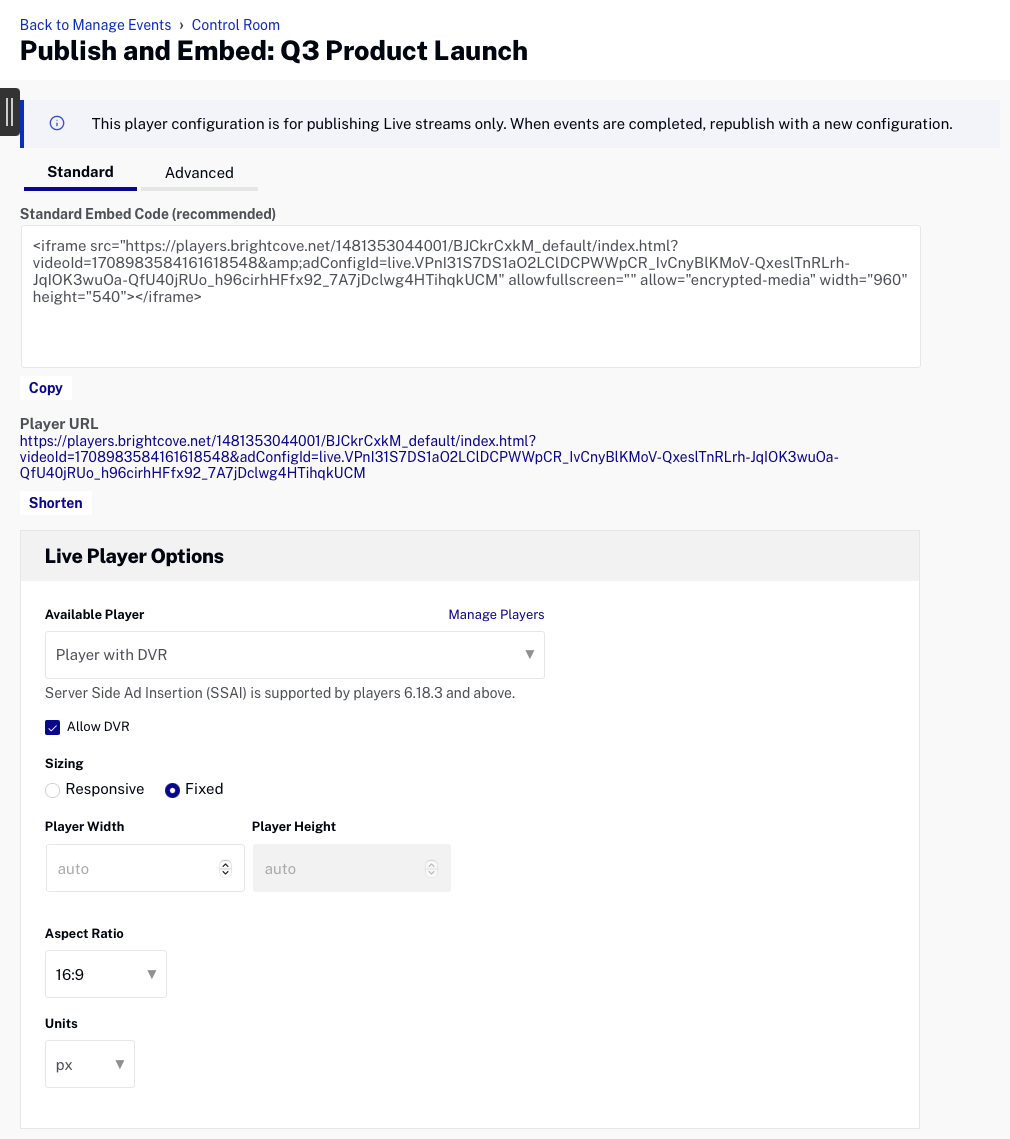
To view the live event video properties, click on the event name to open the Control Room.

Creating a new event

For a complete step-by-step guide to creating and streaming a live event using the Live module, see one of the following topics:

To create a new event, follow these steps.

  1. From the Manage Events page click Create Event. The Create Live Event or Create Live Channel page will open. The properties when creating events and channels are the same. The screen shots in this document cover creating an event.
  2. Enter the event details:
    • Event Name - Name for the event; this name will also appear in the Media module if the video is saved as a video asset (max 255 characters)
    • Short Description - Description of the event (max 250 characters)
    • Tags - Tags to associate with the event; tags will be assigned to the video if the video is saved as a video asset (max 128 characters and 1200 tags)
    • Reference ID - Reference ID for the event; must be unique (max 150 characters)
  3. Any required custom fields for the account will be displayed. Assign values to the custom fields.
  4. Setting Streaming to Social Media to Allowed will make the event available for streaming to social media platforms. This can be done once the event has started streaming or by using the {% if site.product_short == "Video Cloud" or site.product_short == "Beacon" or site.product_short == "CorpTV" %} Social module. {% endif %} {% if site.product_short == "Live" %} Social module. {% endif %}
  5. Select a Streaming Latency option.
    • Regular - Live delay can be approximately 30-45 seconds
    • Low Latency - Live delay reduced to approximately 5-10 seconds (see the Using Low Latency streaming section below)
  6. Select a Live Ingest Profile. The dropdown list will list all Live ingest profiles. The ingest profile will control the quality and number of live renditions that are created. Clicking the Manage Profiles link will open the ingest profile editor in another browser tab. Note that you must be an account administrator to access the ingest profile editor. Click the Renditions link to view the renditions that will be created using the selected ingest profile.
  7. Select Convert event to video asset when complete to save a VOD version of the live video to your Brightcove account. When this option is selected, the highest quality rendition from the selected Live Ingest Profile is used as the source for the VOD video. The default ingest profile for the account is used when creating renditions. Note that the VOD version is not available as soon as the live event ends, the video will be available once the ingestion process is complete.
  8. Click Integrations to add an integration with a Zoom meeting. For information, please refer to the Integrating a Zoom meeting documentation.
  9. Click Stream Options and select a Region. The Region is the Amazon Web Services (AWS) region to use. To reduce latency, you should select the region that is closest to where your encoder is located. By default, the region is set to Oregon (US West) which will produce bad results if you are streaming from another continent. The following regions are supported:
    regions
    regions
    • Oregon (US West) (default)
    • Virginia (US East)
    • Tokyo (Asia Pacific)
    • Seoul (Asia Pacific)
    • Singapore (Asia Pacific)
    • Sydney (Asia Pacific)
    • Mumbai (Asia Pacific)
    • Frankfurt (EU)
    • Ireland (EU)
  10. Click Advanced Options and configure the advanced options.
  11. Click Create Event to start the live event. The Control Room page will open with details about the live event including the Streaming Endpoint (RTMP URL) and Stream Name which will be used by your encoder.

    By default, the encoder must be started within 30 minutes from when a new event is created.

Click Stop Streaming to end the event.

Interactivity

When creating a new event, Click Interactivity to configure overlays or lead forms.

Lead Forms

  1. Click
  2. Enter your Form Code
  3. Click Save

Overlays

  1. Click
  2. Configure your overlay
  3. Click Save

Configuring advanced options

When creating a new event, advanced options can be configured. To configure the advanced options, click the Advanced Options link when creating the event.

The following options can be configured:

Click Edit Configuration to view/edit the API request that will be made to create the live stream. Caution should be used when editing the API call directly.

Using low latency streaming

Latency refers to the delay between when a video is captured and when it’s displayed on a viewer’s device. When creating a new live event, there is an option to use Low Latency.

Low latency provides near real-time streaming with streaming delays reduced to approximately 5-10 seconds. Low latency is recommended when faster interactions are needed but may provide an inferior quality of experience. There are factors outside of Brightcove's control that may determine whether a low latency feed can be delivered (encoder, viewer bandwidth, etc.).

For low latency source encoder setup, the following is required.

The following options are not supported when using low latency:

Note: Low latency requires Brightcove Player version 6.62.0 and above.

Introduction to recurring events

Selecting the Create this as a recurring event using a Static Entry Point (SEP) option allows for a long-running live stream that can be activated and deactivated while keeping the same entry point URL and playback URL. When using recurring events, the streaming endpoint URL and video ID will not change.

Limitations

The following limitations apply when working with recurring events:

Working with recurring events

To create a recurring event, select the Create this as a recurring event using a Static Entry Point (SEP) option when creating a live event and then click Create Event.

When the recurring event is created, it will appear in the Standby tab on the Manage Events page.

The recurring event status can be one of:

Activating a recurring event

Activating a recurring event makes the job available for streaming. The recurring event should be activated before the encoder is started. To activate a recurring event:

  1. Click on the Standby tab.
  2. Click on the event name to open the event in the Control Room.
  3. Click Activate.
  4. Start your encoder.

When the recurring event is activated, it will move from the Standby tab to the Live tab.

Deactivating a recurring event

Deactivating a recurring event disables the job for streaming. When the event is over, the recurring event should be deactivated. To deactivate a recurring event:

  1. Click on the Live tab.
  2. Click on the event name to open the event in the Control Room.
  3. Click Deactivate.
  4. Stop your encoder.

Archiving a recurring event

Archiving a recurring event permanently deactivates the job so it can't be enabled for streaming. Eventually the event will be deleted. Only events where streaming was started can be archived. If a recurring event was created and streaming never started, a Cancel button will appear vs. an Archive button.

To archive a recurring event:

  1. Click on the Standby tab.
  2. Click on the row for the event to select it.
  3. Archive button becomes red
  4. Click Archive

Viewing live event info using the Control Room

The Control Room page is used to view information about a live event. When you create a new live event and streaming begins, the Control Room page will open displaying the event information. A preview of the event will appear in the preview player. The Control Room page is also displayed when you click on an event on the Manage Live Events page. Click the Monitoring tab below the preview player to view monitoring information while the stream is in progress.

The Control Room page Event Information tab is organized into the following sections:

Click the Monitoring tab below the preview player to view monitoring information while the stream is in progress.

Event Status

The Event Status section is displayed only while an event is in progress. The following information is displayed:

  • Job Status - Current job status
    • Streaming - Stream is live
    • Processing Error - The Live stream has encountered an error
    • Standby - Stream ready to be activated (static entry points only)
    • Stopping - The live stream is stopping and creating any associated VOD outputs
    • Completed - Live stream has completed
    • Cancelling - The live stream is stopping and will NOT process any pending VOD outputs
    • Cancelled - The live stream has been cancelled
    • Disconnected - The encoder has been disconnected
    • Waiting - Waiting for the RTMP stream (encoder to start)
    • Failed - The job has stopped as a result of a system error
  • Current Viewers - Number of current viewers. Please note this is just an estimation and the figure may not be accurate for events with a low number of viewers or spikes in the audience.
  • Elapsed Time - Stream elapsed time since it was started (not when it was created)
  • Current Time - Current UTC time

Event Information

The Event Information section displays the following information:

  • Name - Name of the event
  • Job ID - Internal job ID
  • Video ID
  • Short Description
  • Tags
  • Reference ID
  • Streaming to Social Media - If Allowed, the live event can be assigned to a scheduled social event
  • Streaming Endpoint (RTMP URL) - Streaming endpoint used by the encoder
  • Stream Name - Stream name used by the encoder
  • Region - Streaming region
  • Playback URL - URL that can be used to view the live stream in a non-Brightcove Player

Clips

The Clips section displays all of the clips that were created from the live stream. Clicking the clip name will open the clip in the Media module. For information on creating a clip, see Creating a Video Clip Using the Live Module.

Monitor

The Monitor section displays the Input and Output Drift for the stream. Click Retrieve updated data and graphs to view updated graphs. If the account is enabled for extended monitoring, the Monitor section will be replaced with a Monitoring tab below the preview player. See the extended monitoring section for details.

Renditions

The Renditions section displays details about the renditions that were created. Clicking on a rendition link will show the encoding settings for the rendition.

RTMP

The RTMP section can be used to add RTMP Outputs. This allows the live stream to be sent to other RTMP entry points. This can be used to send the live to stream to Facebook or YouTube for example.

Enter the RTMP Output URL and the Rendition to send. Note that the format of the output URL may change depending on where the RTMP stream is being used. For more information, see Using Live RTMP Outputs to Stream to Facebook and YouTube.

Social Event

The Social Event section will display information about the scheduled social event the live stream is assigned to, if any.

Viewing extended monitoring

By default, the Live module will display a Monitor section with Output and Input Drift graphs. If you would like to enable the extended monitoring, please contact your Brightcove account representative. Extended monitoring will display a Monitoring tab below the preview player. The monitoring information is available while an event is in progress and for up to 1 hour after the event ends.

Click Select Graphs to select which graphs appear and for a description of what each graph contains.

The following graphs are available:

Monitoring the stream

The Monitor section displays the Output and Input Drift graphs. Click the Retrieve updated data and graphs link to view the information. Output Drift measures the healthiness of the stream. Output Drift is defined as the difference between the wall clock vs. stream timestamps (TS). In live streaming, ideally, the wall clock should run at the same pace as stream TS, if the stream TS arrives slower than real time this means that there is a problem (bottleneck) in the system.

Input Drift measures the health of the input stream and is defined as the difference from the input timestamp and the real time clock.

Duplicating an event

Duplicating an event makes it easy to create another event with the same settings that were used to create a prior live event. To duplicate an event, follow these steps:

  1. Click on an event to open the Control Room page.
  2. Click Duplicate at the top of the page. A new live event will be created using the settings from the prior live event. Make changes to the event properties as needed.
  3. Click Create Event.

Generating the embed code for a live event

To generate the embed code for an event, click Publish and Embed in the left navigation. Two types of embed code are available:

You also have the ability to get the URL to the published player. This is useful for viewing the event in a browser.

To generate the embed code for a live event, follow these steps:

  1. Click on an event to open the Control Room page.
  2. Click Publish and Embed in the left navigation.
  3. Select a Player.
  4. When Allow DVR is checked, the player will request the DVR manifest instead of the live manifest. This option is only available if the event was created with the Create Cloud DVR option selected. If the event is published using a Brightcove Player version earlier than 6.33.0, the Live DVRUX Plugin is required.
  5. Select Content Delivery Network (CDN). This option is used to select a specific CDN in case the Live Job was configured for Multi-CDN. It should look similar to this:
  6. Click the Player URL to preview the event in a browser or copy the appropriate embed code to use.

    Another option to preview your Live Streaming is doing it through the API.

    Copy the playback_url value returned from creating a Live job using the Live API, and paste it into the Safari browser. Since this browser supports native HLS playback, you should see your live stream.

    Also, you can copy your URL and paste it into the Brightcove Player Reference App here:

    https://players.brightcove.net/3303963094001/player-reference-app/index.html

Connecting to social media

It's possible to connect a live event to a social event that was scheduled in the Social module. Before you can connect a live event to a social event, you should create a live event in the Social module. Only events that were created with the Streaming to Social Media setting set to Allowed can be assigned to a scheduled event.

To connect a live event to a social event, follow these steps:

  1. Create a live event in the Social module.
  2. Click on an event to open the Control Room page.
  3. Click Connect to Social Media in the left navigation. A list of scheduled social events will display. If no events display, no scheduled events exist.
  4. Click on a scheduled event and then click Connect.

Once the event is assigned using the Live module, return to the Social module to preview the event and start the streaming process to the social platform.

Creating a clip

Clips can be created while the event is in progress or after the event has ended. If clips can't be created, a message will appear when hovering over Create Clip in the left navigation. For information on creating a clip, see Creating a Video Clip Using the Live Module.

Live event reporting

Click Reporting in the left navigation to view Live analytics.

If the Enable Server Side Ad Insertion (SSAI) option was selected when the event was created, the Control Room page will display a Goto Ad button. When clicked, the length of the ad break can be selected.

Click Insert to insert an ad break into the live stream. If the ad doesn't fill the entire ad break time, the fill slate will be displayed. For information on working with server-side ads in the Live module, see Implementing Server-Side Ads in the Live Module.

Troubleshooting live stream issues

If you need further help getting your live event to work, you can contact us. To make sure you get the fastest response possible, below is a list of what support will need to solve the problem.

Limitations