{{ page.title }}

{{ page.description }}

When you upload your video, {{ site.product_short }} automatically transcodes your single video into a collection of renditions, each suitable for the typical range of your viewers’ bandwidth and resolution. Then, {{ site.product_short }} dynamically detects the screen size and connection speed from the environment where your video plays, and serves the right rendition of your video to maximize quality given the speed and power available to each individual viewer. This article offers best practices for recording, exporting, uploading and publishing your {{ site.product_short }} videos that assures optimum playback of your content everywhere it plays.

The tables below summarize the settings that you can use when creating video content:

Video

Format MP4, M4V, MOV
Codec H.264, H.265 (HEVC)[1-1]
Bitrate 2x the bitrate of the highest rendition
Frame rate Constant, usually between 15 - 60 frames per second
Aspect ratio Your video aspect ratio will be preserved. An aspect ratio of 16:9 is common.

Notes

Audio

Codec AAC (Advanced Audio Codec)
Bit rate Constant, 128 kbps
Channels Stereo
 

Now, you are ready to look further into the details of these settings:

The {{ site.product_short }} publication workflow includes the following processes:

Step 1: Before you Record

Source Encoding

There are many factors that impact the overall results of transcoded media. It is not realistic to provide a one-size-fits-all recommendation, so this step will list some of the more important considerations and how they affect the output.

General

  • Try to start with the highest possible source media if possible. Successive transcode passes reduce the overall quality exponentially. If possible, start with the uncompressed source. Because of increased file transfer and ingestion times, it may not always make sense to send a raw source. In these cases, it is best to upload a source with 2-3x the bitrate of the highest rendition you expect to generate. So if you intend to have a top rendition with a video bitrate of 3 Mbps, then you would want to upload a source video with a bitrate of 6-9 Mbps.
  • If the raw source must be compressed before uploading, H.264 and AAC are the preferred video and audio codecs.
  • Do not use multiple video or audio streams. Occasionally we see source media that may have more than one audio or video stream. This is often the case with media copied directly from a DVD. While we make a best guess as to which stream to use, there is no way for us to know what stream was preferred.
  • Avoid stream delays. For example, some video editing tools will inject a start time for the audio stream such that the audio starts playing at some time after the video. We have found that some tools introduce audio sync issues during this process.

Video

  • The frame size should be at least as large as the largest anticipated rendition. However, do not scale media to a frame size larger than the original.
  • H.264 requires that frame sizes are multiples of 4 and is optimized for multiples of 16. We will scale transcodes to meet this requirement, but for best results source media should already be encoded in multiples of 16. Multiples of 8 or 4 will also work though with a slight performance decrease.
  • Avoid interlacing. Most web and mobile video players do not handle interlaced content well. While we will detect and remove interlacing, there can be a quality loss during the conversion.
  • Avoid anamorphic video. Anamorphic video, or video with a non-square Pixel Aspect Ratio, does not play correctly in some mobile and Web players. We attempt to detect anamorphic video and convert it, but occasionally the original source metadata is incorrect. This can prevent us from converting the material correctly.
  • If you are creating a screencast with a tool such as Camtasia, see Creating and Publishing High Quality Screencasts for some best practices and tips when exporting your screencast and uploading it to {{ site.product_short }}.

Audio

  • For maximum compatibility, use stereo or mono audio and avoid 5.1.
  • Normalize the audio tracks to standard levels such that you avoid "clipping" while also avoiding a low volume.
  • Make sure that audio levels are consistent across media that might be viewed together.

Step 2: Recording

What is my content and where will it play?

In most cases, when you publish your videos using {{ site.product_short }}, they look great across all distribution targets, whether they are playing amid other content within a browser, in full-screen mode, in the confines of small mobile device screens, or spread out across large monitors. Still, it's best when recording your video to make a practice of considering both the nature of your content and the viewing conditions of your audience. You can take some measures when recording tricky content to show under challenging conditions, such as an instructional screen cast with small text you would like to make crisp and legible from both a player included with other browser content and as a full screen video, or an HD news cast shown to countries with populations having low bandwidth Internet access.

Here are some recommendations for recording practices to avoid issues with content and playback:

  • De-interlace at record-time. For the best quality playback, {{ site.product_short }} de-interlaces all content. When recording with a camcorder, set the record setting to progressive not interlace. If you are working with an already recorded interlaced video as a source file, opt to check the de-interlace setting within your video editing software at compression time in preparation for uploading to {{ site.product_short }}. If you do not transcode your video with {{ site.product_short }}, and you shot an interlaced video, de-interlace the video file before uploading it.
  • Capture at a constant frame rate. To best avoid stuttering during playback, record video at a constant frame rate and avoid a variable frame rate when creating your source files. Also, shoot progressive and use the same frame-rate you will publish to - 30 fps is a good place to start.
  • Adopt a strategy for screencasts. Creating recordings with clear, crisp, and legible text is especially challenging when creating software tutorial videos you intend to play both from a player within a browser and in a full-screen mode. See Creating and Publishing High Quality Screencasts for some best practices and tips when exporting your screencast and uploading it to {{ site.product_short }}.
  • Avoid camera shake. While this may seem obvious for viewing, shaking actually impacts the encoder's ability to compress material using motion estimation algorithms. In other words, lower compression and lower quality.
  • Avoid noisy backgrounds. This applies to video as well as audio. In the case of video, things like background movement (e.g. traffic) and complex background images (e.g. noisy wallpaper) all impact compression negatively. Similarly, background noise during an interview reduces audio compression.
  • Use proper lighting. Darker scenes can be more difficult to encode without quality loss.

Step 3: Exporting

What compression format do I upload to {{ site.product_short }}?

Brightcove recommends uploading a video source file encoded as an H.264 format to leverage optimum quality for the widest range of delivery targets. The H.264 codec offers the maximum opportunity for {{ site.product_short }}'s transcoding engine to create the highest quality renditions for the range of resolutions and bandwidths where your video plays. See Supported Video Codecs and Containers for more on the distinction between codecs, containers, and file types. For detailed specifics on the best format for your {{ site.product_short }} video uploads, see Video Source File Specifications and Recommendations.

Checking your video's codec

To be sure your video source file is encoded in a H.264 format, you can verify the format in the QuickTime player's movie inspector:

  1. Open QuickTime Player. You can get QuickTime for free at https://www.apple.com/quicktime/download/.
  2. Select File > Open File... and choose your exported video file.
  3. From your opened video in the QuickTime player, select Window > Show Movie Inspector.
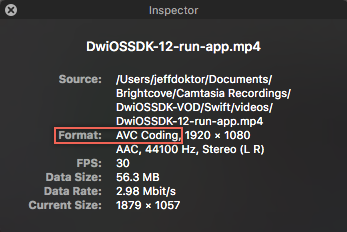
  4. In the movie inspector window for your video, check that the Format is H.264/MPEG-4 AVC (Advanced Video Coding).

The QuickTime movie inspector is a handy tool for reporting the format, resolution, frame rate, and other properties of your compressed video source file.

Guiding principles when exporting from video editing software

When compressing and exporting videos from your favorite video editors, we recommend compressing your videos using an H.264 codec and letting {{ site.product_short }} automatically create renditions best for multiple resolutions and bit rates. In addition, we recommend:

Step-by-Step export instructions

For recommended specific instructions for exporting videos from tools like Apple Final Cut Pro X, Telestream ScreenFlow, Adobe Premiere Pro or Techsmith Camtasia Studio, refer to the detailed instructions provided by these software packages.

Step 4: Uploading

How do I get the flexibility I need from my source file?

Upload your video or videos using the Upload module in {{ site.product_short }} Studio.  See Uploading Videos Using the Upload Module for more information. Alternatively, you can upload a batch of videos using the Dynamic Ingest API.

When you upload a video to the {{ site.product_short }} platform, {{ site.product_short }} stores it as a digital master. This digital master is the source for all renditions {{ site.product_short }} creates. The digital master is also the source if you should ever elect to retranscode your video in order to change your transcode settings.

Step 5: Transcoding

How long will it take to process my video?

It can take up to three times the duration of the video for the transcoding process to complete.

What is my content, where is my audience watching it, and what is my audience watching it on?

If you want your videos to play beautifully across a range of screen sizes such as in the three screen strategy of publishing to desktop, mobile device, and wide monitor TVs, and if you want your videos to play smoothly across a range of connection speeds from dial-up, to cellular, to high speed cable, you must start with a video file that plays as optimally as possible in each of those environments. To assure that your video shows as beautifully as possible across the variety of the size and speed conditions of your viewers, {{ site.product_short }} creates a collection of video files, called multi-bitrate renditions, each of various sizes and qualities. When {{ site.product_short }} detects the resolution, bandwidth, and other conditions of the device requesting to play your video, it serves the best rendition of your video for that environment, be it a smaller and slower version to fit the constraints of a mobile device screen or low bandwidth connection, or be it a full-quality version that takes advantage of wide screen monitors with high speed, and high definition capabilities.

You have fine grain control of the speed, size, and encoding quality of these rendition files. If you know the connection rates, devices and screen resolutions of your audience, you can tailor each rendition file of your videos to create a collection of renditions that targets size and speed conditions of those viewers.

Further reading on setting multi-bitrate renditions