An Experience is a video with other elements (like synced slides or an e-commerce cart) outside the video player that dynamically interact with video player. Experiences allow you to dynamically communicate between a video and the web page itself, opening the door to a new generation of lean-forward interactive realities for your viewers.
Creating a new experience
Follow these steps to create a new experience.
- Login to Video Cloud Studio.
- Open the Interactivity module.
- In the left navigation, click Experiences > All experiences.
- Click .
- Enter an Experience Name.
- Choose an experience type.

- Click .
- Select one or more projects to add to the experience.
- Click .
- Confirm the experience settings and then click .
For information on creating the different types of experiences, see the related topic:
Editing an experience
Follow these steps to edit an experience.
- Open the Interactivity module.
- In the left navigation, click Experiences > All experiences.
- Click on an experience Title or click the action menu (...) associated with the experience and click View.
Configuring experience settings
The experience settings can be used to change the experience title, tags and to control the behavior of the experience. Note that the settings that are available will vary based upon the experience type.
Follow these steps to configure the experience settings.
- Open the Interactivity module.
- In the left navigation, click Experiences > All experiences.
- Click an experience Title or click the action menu (...) associated with the template and click View.
- Click .
- Edit the settings as needed. When done click .
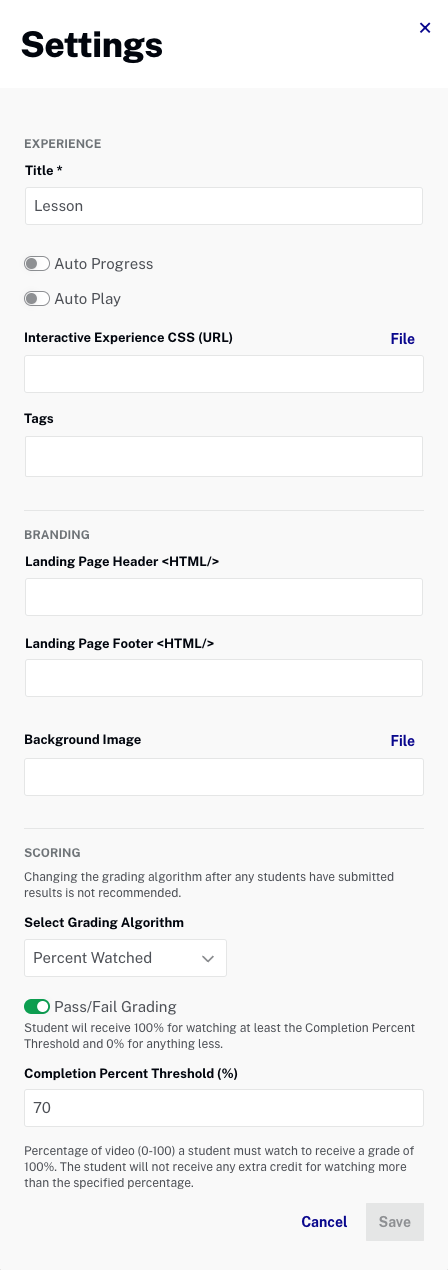
Experience settings
The EXPERIENCE settings are available for all experience types.
- Title - Title of the experience
- Auto Progress - Will play the next video in the playlist after the previous project finishes
- Auto Play - Will auto-play on landing page load
- Interactive Experience CSS (URL) - URL to a custom CSS file used to style the experience
- Tags - Tags for the experience, tags facilitate searching experiences
- Default Zoom - Sets the default zoom level of the experience (Slide Sync only)
Branding settings
The BRANDING settings are available for Branching, Slide Sync and Lessons.
Experiences can be shared with viewers either by embedding the project in a web page or by sharing a landing page. A landing page is a single page that a viewer can access at a static URL. The branding settings can be used to style the appearance of the landing page.
- Landing Page Header HTML - HTML that will be displayed on the landing page header
- Landing Page Footer HTML - HTML that will be displayed on the landing page footer
- Background Image - Background image for the landing page
Scoring settings
The SCORING settings are available for Lessons only.
- Select Grading Algorithm
- Quiz Results - Score is number of correct questions divided by total number of questions
- Gate Until Watched - Score is 100% if user watches more than Completion Percent Threshold; user cannot submit until they watch to the threshold
- Percent Watched - Uses Pass/Fail grading
- Pass/Fail Grading - When enabled, student will receive 100% for watching at least the Completion Percent Threshold and 0% for anything less
- Completion Percent Threshold (%) - Percentage of video (0-100) a student must watch to receive a grade of 100%
Adding projects
Follow these steps to add additional projects to an experience.
- In the left navigation, click Experiences > All experiences.
- Click a template Title or click the action menu (...) associated with the experience and click View.
- Click .
- Select additional projects to add.
- Click .
Changing the play order
Follow these steps to change the play order of projects in an experience.
- In the left navigation, click Experiences > All experiences.
- Click a template Title or click the action menu (...) associated with the experience and click View.
- Click .
- Click on a project and drag it to its new location in the play order.
- Click .
Moving an experience to a folder
Folders can be created and used to organize experiences. You must have created folders before you can move an experience to a folder. Follow these steps to move an experience to a folder.
- Open the Interactivity module.
- In the left navigation, click Experiences > All experiences.
- Click the action menu (...) associated with the experience and click Move to Folder.
Duplicating an experience
Duplicating an experience is a great way to save time when creating new experiences that are similar to ones already created. Simply add/remove projects and edit the experience settings as needed.
Follow these steps to duplicate an experience.
- Open the Interactivity module.
- In the left navigation, click Experiences > All experiences.
- Click the action menu (...) associated with the experience and click Duplicate.
- Click .
This will create an exact clone of the experience including all projects, tags, and custom CSS, titled "{experience_name} - Copy".
Deleting experiences
To delete an experience, find the experience on the experience list, click the action menu (...) associated with the experience and then click Delete.